Tuesday, December 10, 2013

Clearance Rack Blitz December 2013

A new Clearance Rack Blitz begins today, 10 December, 2013.
Retired products up to 80% off will only be available while supplies last.

Shop online Click here to go to my shop. AND under the heading "Clearance Rack" go shopping.


Thanks for looking, leave a comment if you wish. Or email me here for any orders and queries, or check into my shop, under tab headings above for Stampin' Up! products.

Cheers Tamsin Adams
Independent Stampin' Up!® Demonstrator and lover of all crafty things...


Sunday, December 1, 2013

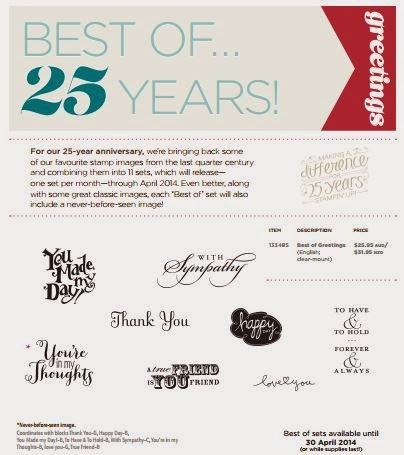
THE BEST OF sets of stamps...

Here is a Current list of the Best OF Stamps per month

Download the flyer for every month under each picture

  • ALL stamp sets are available until 30th APRIL 2014 
  • All Best of stamp sets are available in Clear-Mount only. 
  • The stamp images may be sized differently from the original stamp sets. 
  • All Best of stamp sets will include 3-5 images, including a never-before seen image, and will be priced at $25.95. 
Best of Flowers : June 2013
download here

Best of Butterflies : July 2013
Best of SHELLI: August 2013
download here

Best of Christmas: September 2013
download here

Best of Birthdays:  October 2013
download here
Best of Sale-A-Bration:  November 2013
download here

Best of Love:  December 2013
download here
Best of Brides and Babies:  January 2014
download here

Best of Greetings:  February 2014
download here
Best of Greetings:  March 2014


download here
Best of SNOW:  April 2014
download here
Get yours today, I love it...

Thanks for looking, leave a comment if you wish. Or email me here for any orders and queries, or check into my shop, under tab headings above for Stampin' Up! products.

Cheers Tamsin Adams
Independent Stampin' Up!® Demonstrator and lover of all crafty things...


Wednesday, November 20, 2013

A quick and easy Christmas Star card.

This Christmas Star stamp is available as a single stamp while supplies last or until 31st January 2014, for only $16.95...(#134813 order number.)

I love these colours together. Brown Sugar and Real Red along with Whisper White. I've also used the stamp sets Gorgeous Grunge (so universal) and Greetings of the Season...


OR click here to download the flyer...


Thanks for looking, leave a comment if you wish. Or email me here for any further information on any of the products you see here...

Cheers Tamsin Adams
Independent Stampin' Up!® Demonstrator and lover of all crafty things...

Friday, November 15, 2013

Merry Little Thinlit Card

This is my version of the Circle Thinlet card, with extra length...

There are so many popping up in my Pinterest feed, I just had to play.

I also love the gorgeous grunge stamp, especially when I NEVER have any spare matching Desginer Series Paper. (but I did find some for this card, in this case).

It just breaks the simple clean colour...Love it.


FRONT

HALF OPEN AND FLIPPED...

FULLY OPEN.
SUPPLY LIST:

  • Bermuda Bay ink, cardstock 
  • Real Red ink, cardstock 
  • Gumball Green ink, cardstock
  • Twine from the tag a bag accessory kit in Bermuda bay. Pg 158 AC.
  • Gorgeous Grunge stamp set 
  • Oh Goodie! Stamp set, from the holiday catalogue 2013
  • Merry Little Christmas stamp set, from the holiday catalogue 2013
  • Ornament keepsake stamp set, from last years holiday catalogue 2012
  • Circle Thinlets set 
  • Venetian Romance DSP 
  • Round corner punch
  • 2 ½ “ circle punch 
  • snail adhesive, but I do use my own double sided tape when I've run out
  • 2 way glue pen
  • Glue dots 

Get yours today, I love it...Have a happy merry christmas card making day...

Thanks for looking, leave a comment if you wish. Or email me here for any orders and queries, or check into my shop, under tab headings above for Stampin' Up! products.

Cheers Tamsin Adams
Independent Stampin' Up!® Demonstrator and lover of all crafty things...

Wednesday, November 13, 2013

little stained glass dragonflies

My new little dragonflies, love them to bits....These will be for sale on my facebook page, where I will keep track...link here -> Tamsininamania


One for my girls window...I just need to add the legs...too excited I just had to share.

and another abstract cased idea from Pinterest for my boy's window.

Thanks for looking, leave a comment if you wish. Or email me here for any orders and queries, or check into my shop, under tab headings above for Stampin' Up! products.

Cheers Tamsin Adams
Independent Stampin' Up!® Demonstrator and
lover of all crafty things...

Thursday, October 31, 2013

10 minute card, because it never takes just 5.

Just made a really quick card in 10 minutes not 5...Really. LOL.

Yes Really, AND by the time I had a vision, or pinched an idea of Pinterest, that takes 3 days. AND find at least 5 minutes of spare time, which then takes another day. AND actually sit down to make the card, Well I don't sit, I stand and run around after things, kids and chickens, because I can...there's my 10 minutes...

But I am happy with it...I've also used the very vanilla, because I am waiting for more whisper white card stock, my biggy favourite...

A simple two stamp set card, with few colours, and one card stock. EASY right. Of course it is, give it a go...Also trying out the Envelope punch board for the curved corners...so easy... :)


Here is a video to see how it works. 
CLICK HERE

Thanks for looking, leave a comment if you wish. Or email me here for any orders and queries, or check into my shop, under tab headings above.

Cheers Tamsin Adams
Independent Stampin' Up!® Demonstrator and lover of all crafty things...

Saturday, October 26, 2013

Have ink?

You have some colour card stock, but not stacks?
You have scrappy bits of the same colour as your ink pad?

Get scrappy with your INK...

Here is a card I made with little pieces of scrap and retired Stampin' Up! Designer Series Paper. I have kept so much over the years and I'm trying to use it up...I had no colour to use as a base card, SO inkey it up...have fun. (Crushed Curry, Daffodil Delight AND summer starfruit)...


YOU just have to be patient and wait for the inky edge to dry, before heat emobossing...or get messy... I quite like it though...
And here is the stampset I used Hello, Lovely. Its on sale now with 25% off...


Thanks for looking, leave a comment if you wish. Or email me here for any orders and queries, or check into my shop, under tab headings above.

Cheers Tamsin Adams
Independent Stampin' Up!® Demonstrator and lover of all crafty things...

Tuesday, October 22, 2013

25 percent off these 25 Stamps until the 28th October...woohoo...

Here are the pictures and the prices...to see a better close up picture, go to my shop, listed under headings above.

I really love the star...will be ordering that one myself, yippee for a sale...


Thanks for looking, leave a comment if you wish. Or email me here for any queries.
Cheers Tamsin Adams
Independent Stampin' Up!® Demonstrator and lover of all crafty things...

Monday, October 21, 2013

Regarding Dahlias


Ooopppss I am supposed to be cleaning and tidying up my crafty space. But had the urge to play with Regarding Dahlias, love this stamp...

I had another practice of using my acrylic blocks as a stamp with interesting outcomes...

The first card I have inked the edges of the block and stamped to the white naturals card. and then over the top with the flower...I stamped twice more and fussy cut the flower...mat it up in a matching colour and black...love this look...


I didn't stop there though, lol. In the next card I inked the block and this time spritzed it with water and stamped the same image and sentiment with the same layout. I wanted a more subtle background and I used a paler pink.

And here are few others I played around with trying to use up my scrappy and some retired bits...on a roll...

Stamp your background to make the pattern
Stamp 3 and cut them into squares to fit. Border them up.

Stamp a strip to make a pattern and a feature for your card
Decorative Label window cutout highlighting the flower
AND LASTLY!

Before I really should pack up :)

Tile it, Score your card and stamp to the grooved side. The first one I pressed too hard and it leaked into the grooves. You'll have to be patient trying this technique...

Which one is your favourite? Packing up now...sigh.

Thanks for looking, leave a comment if you wish. Or email me here for any queries.
Cheers Tamsin Adams
Independent Stampin' Up!® Demonstrator and lover of all crafty things...

Friday, October 18, 2013

Leadlight Cabinet - curved door repair

Scary. As I pulled out the windows, the putty and lead were well past its use by date. All the glass pieces were very loose and the putty brittle. So I had decided along the way to relead all panels.
First taking windows out complete was tricky and nerve wracking with a few smashing to the ground.


Then pulling the lead apart to save the glass as the glass was very thin, 2mm...I haven't used this before...Cleaning the glass was also a tricky job as I didn't want to smash the pieces...However I managed to chip the putty off enough to be reusable...

Putting all pieces in place without a pattern after many photos was easier than I thought. Nerve wracking session over...phew . I managed to replace a couple of same size pieces from the other window panel, to make a whole panel...before sourcing my new glass...

Finally found some, I used and recycled a couple of photoframes, that I had stored away to use one day...(I have lots of treasures everywhere :) )


Off to buy new lead and to start over.


There you go...ALL ready to solder, BUT I'm not even half way yet.

The flat panel is very easy, (which I haven't soldered as yet)

The next steps to do are:
  • to solder, then wash
  • the messy part of puttying, and again another wash
  • AND a polish and yet again another wash
  • Finally Installation...the trickiest of all, especially the curved ones...
Keep tuned in for the second part of this post...(sorry will have to keep you in suspense for a bit). I will update and add a link here when done...

Hopefully I will have this finished in time for Christmas this year 2013...lol...

Thanks for looking, leave a comment if you wish. Or email me here for any queries.

Cheers Tamsin Adams
Independent Stampin' Up!® Demonstrator and
lover of all crafty things - today is leadlight...

Hungry Little Caterpillar

It has been a whole month, wow, I guess Life got in the way...lol.

My girls helped make this cute little hungry caterpillar card. I stamped the sentiments using the Memorable Moments stamp set...And I punched the hungry holes (1/2 inch circle) and placed the front onto dimensionals to lift it above coloured inchies...We had a few practice runs to get the finger prints in the right directions...Fun to make...


Thanks for looking, leave a comment if you wish. Or email me here for further queries.
Cheers Tamsin Adams
Independent Stampin' Up!® Demonstrator and lover of all crafty things...